Of the online Ad options there is none better than Google AdWords. The benefits of using Google are many, which include the fact that their search engine is #1 and used by many other search browsers (AOL is one of them) – consequently Google Ads show up on these browsers as well as their own. In addition to Google Ad Words’ effective tools, AdWords is also integrated in Google Analytics and Google Webmaster tools.
That being said, I have traditionally not utilized used Google AdWords since my website ranks at the top for most of my targeted keyword queries, but since I have many clients who would benefit from AdWords I decided to setup an account to target nearby cities to best illustrate and advise others on how to use it.
Firstly, I have six (6) $100 coupons in free Google AdWords advertising that I am pleased to give to any new or existing client. The AdWords campaign needs to be set-up before September 30, 2012 (the coupon expiration date), so be sure to contact me as soon as possible if you are interested.
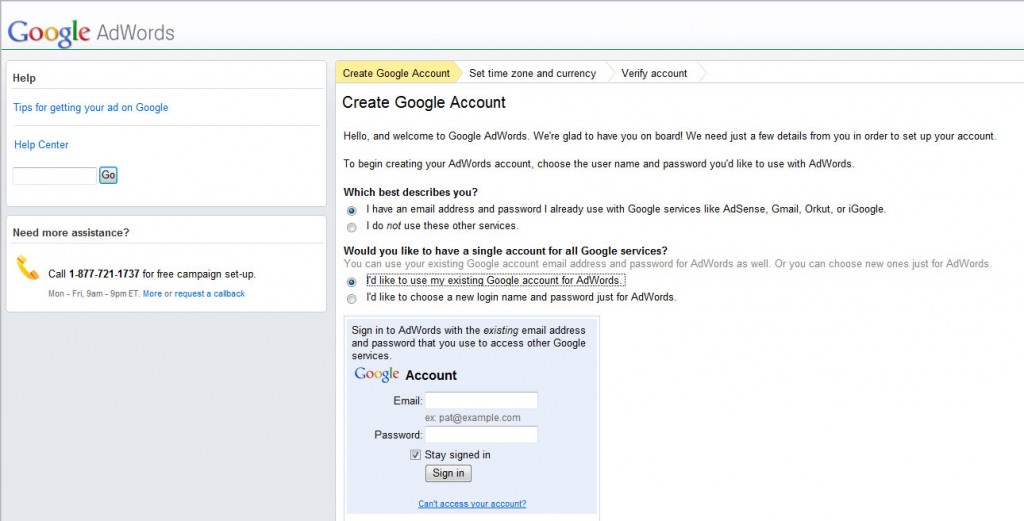
Ok, so AdWords. When you receive a coupon the first thing you do is go to the URL specified, which is https://www.google.com/adwords/
Here you will create a Google account if you don’t yet have one, set the time zone and currency, and verify the account. At this point you will arrive at your AdWords campaign page: https://adwords.google.com/
Select Campaign Settings
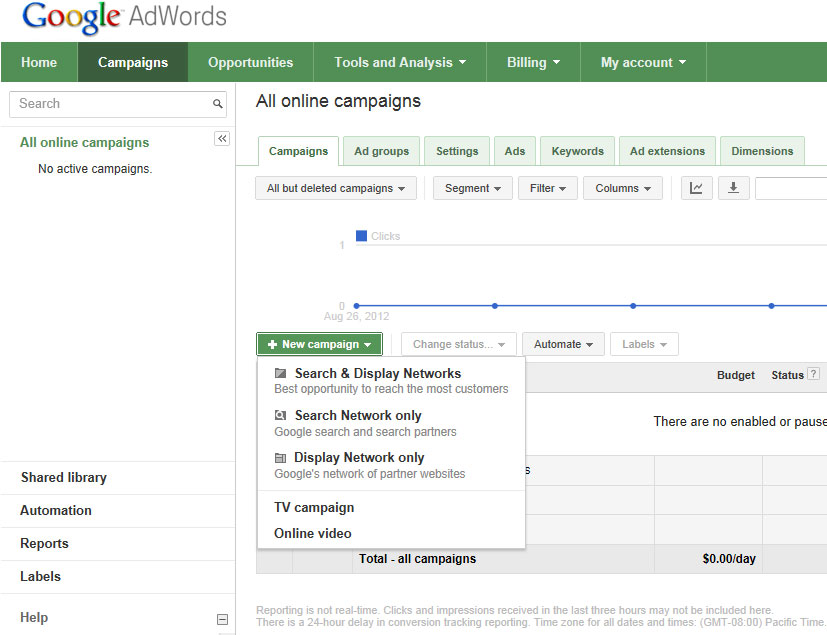
Under General and Networks you name your Campaign, you select a campaign “type”. The additional options are:
- Search and Display Networks – Your ad will show on Google search, search partners, and on Google’s network of partner websites. This is a good choice if you want your ads to reach the widest set of possible customers.
- Search Network only – Your ad will show on Google search and search partners.
- Display Network only – Your ad will show on Google’s network of partner websites.
You can learn more about the 3 campaign types at: https://support.google.com/adwords/bin/answer.py?hl=en&answer=2567043
From my research I decided that the best option for me was the “Search Network Only” utilizing the “Standard – Keyword-targeted text ads showing on Google search results”.
Desktops & laptops, mobile devices and tablets – Here you can choose all available devices or you can select from a list, so as to exclude mobile, tablets, etc.
Locations
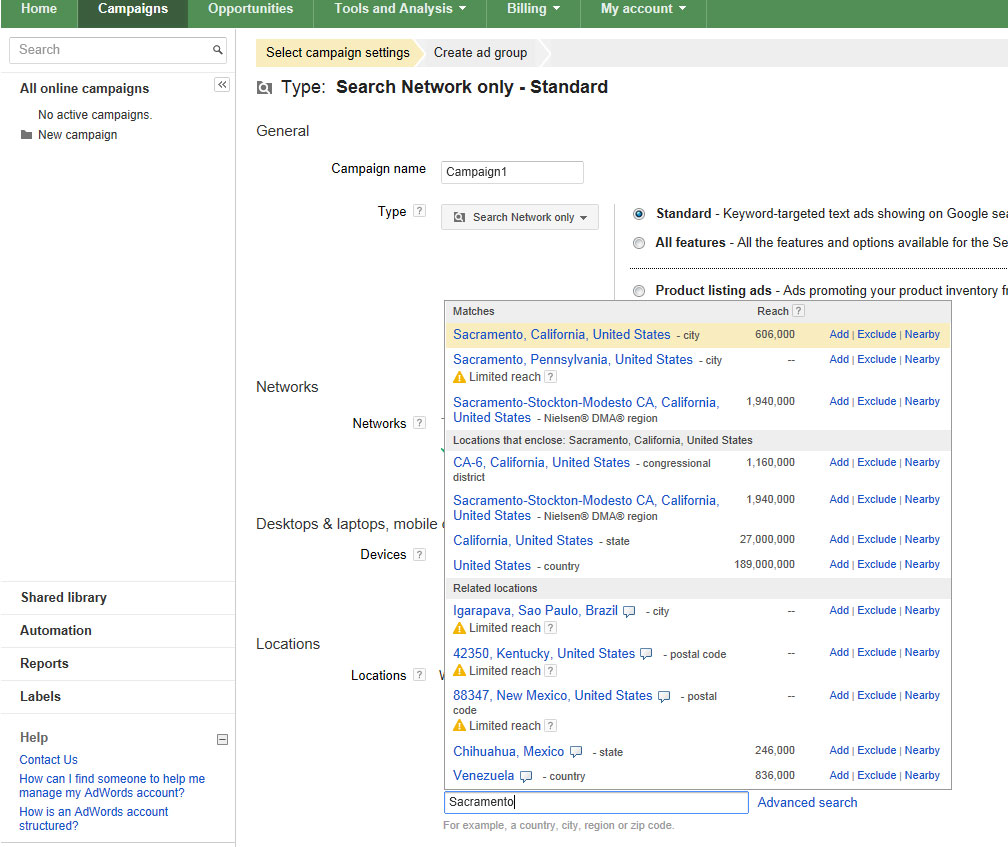
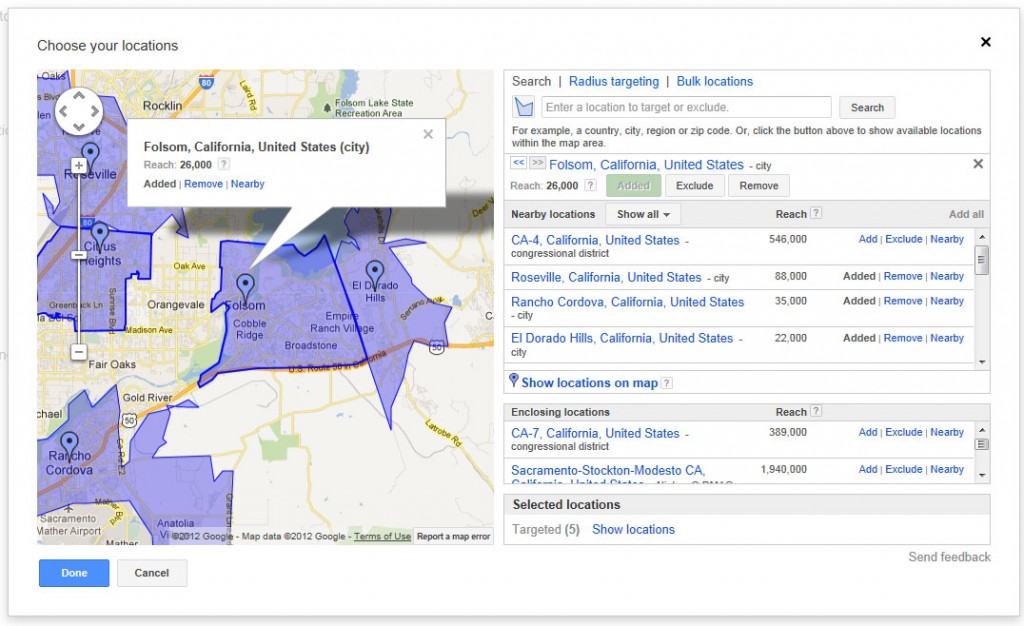
This section asks “What locations would you like to target (or exclude) in your campaign?” This is one of the most important parts of AdWords since Ads for a local business need to be viewed by local customers, not ones outside of your selling area. Of the options, the “Let me choose…” is best. Here you add a city, region, or zip code into the box. Since I am targeting cities nearby Sacramento only, I decided to select “Sacramento City” – the first one with a reach of 606,000 (I will explain why I chose Sacramento following).
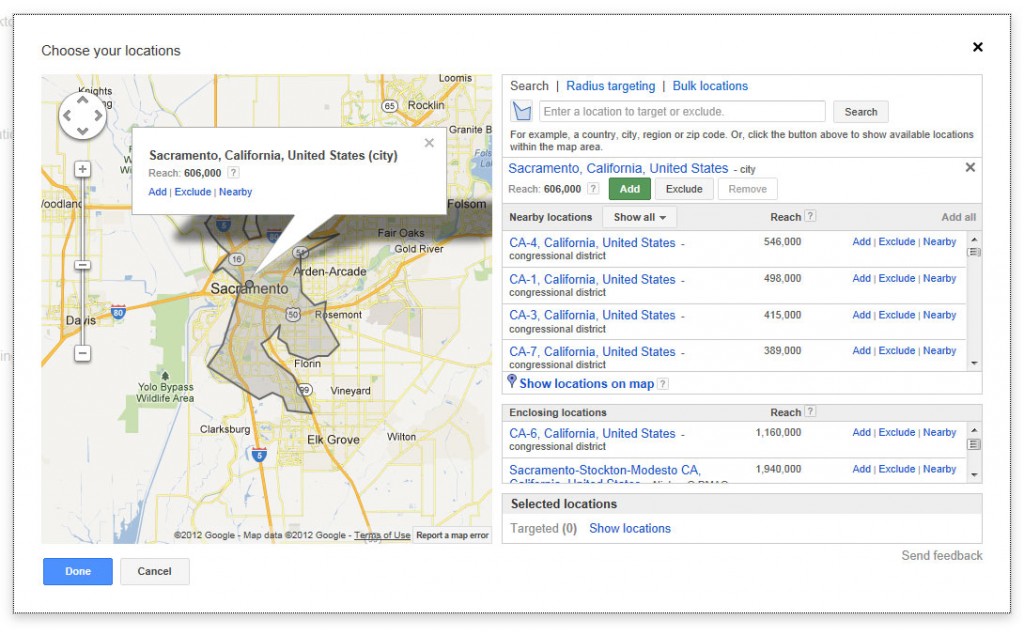
Note the option of “Add | Exclude | Nearby”. I can select “Add” if I am happy with the “reach”, yet “Nearby” is a good way to ensure that I am targeting potential clients effectively. I select this and see:
You’ll likely want to target more than just one city, so here I utilize “nearby location” and “show all” and then scroll to the neighboring cities I want to target. For myself, I select all of the cities “except” Sacramento.
The other option of course would be to select a large region like”California” and then “exclude” all of the cities you don’t want to target. Once you’ve added the right cities then select “DONE”.
To be clear … I already come up well in Sacramento since my website keywords target for this, so with AdWords I have instead targeted for Orangevale, Fair Oaks, El Dorado Hills, Rancho Cordova, Roseville, Folsom, and Citrus Heights. I selected “city” only (not postal codes) since my knowledge of postal code boundaries is limited and I wanted to target very specific areas. At this point you’ll see all of the targeted locations with their reach (population). You can now select “remove” for each, or select “nearby” to add to your location reach as desired.
Bidding and budget
Here you have the option of manually setting your bids for clicks or allowing AdWords to set your bids. With the manual option you will set the maximum CPC (cost per click). Of the two options my thinking is to let AdWords set my bid within my target budget since the system better knows what bid is needed to achieve your campaign goal (which of course is to be seen at the lowest possible cost). In this case you set a daily budget amount and AdWords will assign the bid amount based upon how often my Ad appears in relation to my budget. Since I want to start small I have set my budget to $2.00/day.
It is important to note that the actual daily spend amount may vary. As Google explains: “Your daily spend varies, and may peak at 20% above your daily budget to help your campaign reach its potential. If your daily budget is $2.00 throughout the entire month, you will not be charged more than $60.80 for the month ($2.00 daily budget * 30.4 average days per month).
” To be clear, it is very possible that my daily budget amount is not high enough, which I can always change later. My initial goal is to define the lowest bid amount needed to have my add viewable.
Add Extensions
Here we have location, site links, call, and social. Location will provide a link to a Google Map, Site links allows you to target additional pages (beyond the home page), Call allows someone on a mobile site to call you directly by clicking the Ad, and Social links to your Google+ page. Since my goal is to have a potential customer visit my home page only, not call me, map my location, or go to my Google+ page, I have left all of these unchecked.
At this point you “Save and continue”.
Create Ad Group
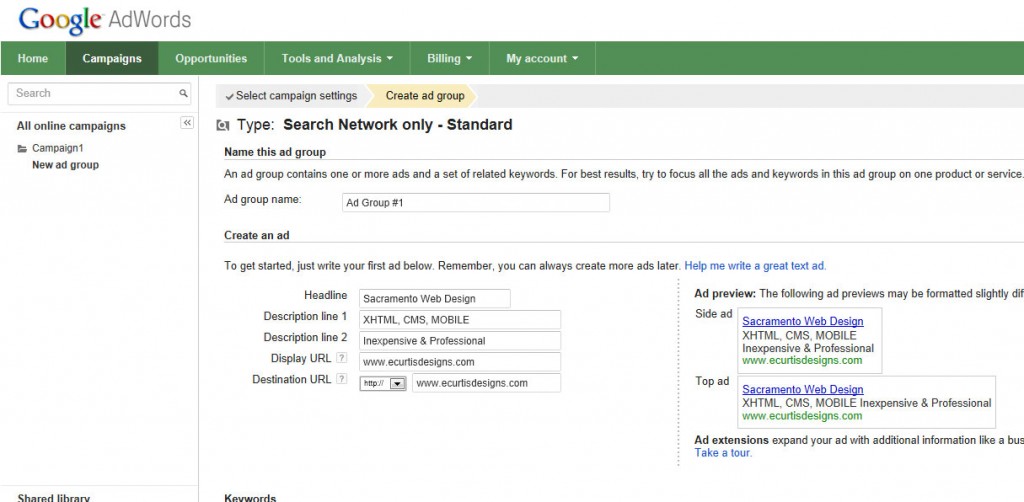
The “Ad group name” will be automatically assigned, or if you prefer you can edit the name to add your own. The “Create an Ad” is the fun part, but this needs to be considered carefully. For myself I want the title to note my location, primary services, and my selling points (inexpensive and professional). I add my URL, and look at the “Ad preview” in the right column to ensure that I like the way it all looks. You will note that you are limited to the number of words you can use for the headline, and the two description lines so you will need to be concise.
Keywords
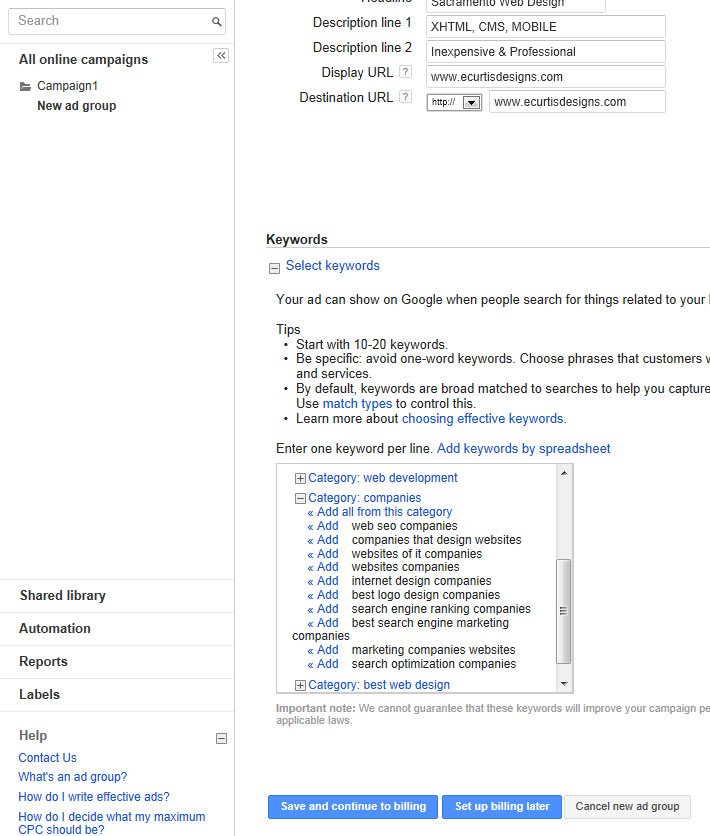
Your Ad needs to be linked to keywords (the words/phrases used in a search query). By default you’ll see a listing of keywords based upon the words you’ve added to your Ad. For myself it was “category: web design company” with the option to add all from this category and/or select different categories by scrolling. Be sure to look at each one to ensure that you are selecting the right category, and then adding the right keyword phrase. I don’t recommend selecting “add all” since you will find many keyword phrases that will have nothing to do with what you are targeting for.
Ok, so if you’re asking, how do I know what the best category is, and the right keyword phrase? Well, this is where “keyword targeting” comes into play. Before getting started with any Ad campaign you need to do some research. I utilize Google’s AdWords Keyword Tool, Google Analtyics reports on my website traffic patterns, and Google Webmaster Tools “top search queries” information. I also do a direct search for the phrases that I want to target for on the Google home “search” page and make a list of my ranking for each. From these I then create a list of the words that I believe will be searched for the most often to find my business type; yet at the same time I want to ensure that the words which I already do well for (such as “Sacramento website design company” – I am ranked #1) are not being targeted for. From my research I know:
“Sacramento web design” is the most commonly searched for phrase for my market. “Sacramento website design” is also a popular search phrase. And I know that variations, such as “web design Sacramento” will provide different search results based upon the wording order, and that many will search for my type of business using additional words such as “company”, “firm”, “business”, “web page”, “web site”, “best”, “top” etc. Of course you can’t target for everything, so I will focus on targeting the nearby cities I don’t come up for well (everything outside of Sacramento), while using the most popular of the targeting variations for my business type.
Here you simply click a category name to expand it and then select the”add” link next to the listing to target for it. Note that once added there is no way to remove it from this screen.
Click the “Save and continue to billing”.
Account Set Up
Just select your region and you’ll then be redirected to the Billing profile page.
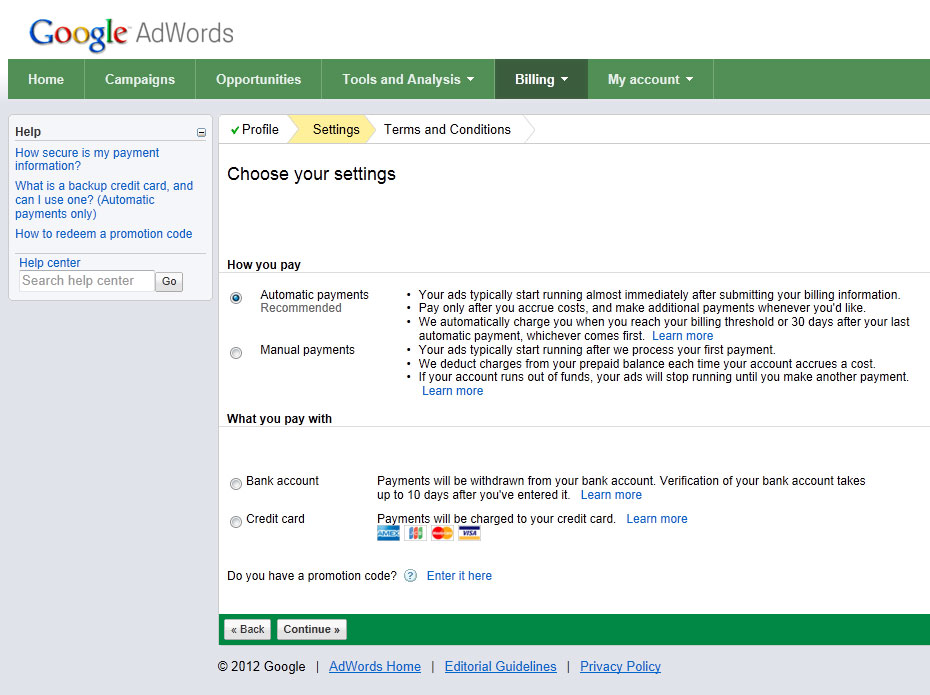
As you can see you have the option of auto-pay, or manual payment utilizing a pre-paid amount. Next you choose whether you want to provide payment through a bank account or credit card. Once you’ve entered all of the payment information be sure to enter your promotion code in the box below: “Do you have a promotion code?”
After you select next you’ll be directed to the “Terms and Conditions” page. You select the “yes, I agree” checkbox and click the “submit and activate my account” button.
———————
After Your AdWords account has been set-up you can log back into your account by going to: https://www.google.com/ads/adwords2/ Select the “Login Now” link on the right column under the text that reads: “Already have an AdWords account?”
Campaign Management
At this point you’ll be forwarded to the Campaign Management page which has the following menu options:
Home | Campaigns | Opportunities | Tools and Analysis | Billing | My Account
- The “Home” section provides an overview graph, similar to what you will see in Google Analytics.
- The “opportunities” section provides “best practices” help guides.
- The “billing” section will show you that you have added a promotion code, and have a “credit” balance. If you’ve prepaid then a starting balance will also be shown.
- The “My account” section is used to define who has access to your account, who receives notifications, and preferences info. This is also the section where you can delete your account if you wish. To delete a Campaign go to: My Account > Preferences – Bottom of page “Want to stop running your AdWords ads?”
You will note that I covered the sections above briefly since they are relatively easy to understand. The two sections with the most features and of the most importance to your active Campaign are “Campaigns” and “Tools and Analysis”.
Tools and Analysis: Tools and Analysis provides the sub-menu page options of “change history”, “conversions”, “Google Analytics”, “keyword tool”, “traffic estimator”, “placement tool”, “contextual targeting tool”, and “ad preview and diagnosis”. If you are familiar with Analytics or Webmaster Tools you’ll find many of these similar to reports you’ve already familiarized yourself with.
- “Change history” documents any changes to your campaign you’ve made. This could be something such as a new budget amount, CPC, keywords added or removed, etc. This is effective since it will show you the
success/failure of your targeting over time. - “Conversions” is specific to having an action performed upon a visitor visiting a page. Conversion tracking needs to be set-up by adding HTML code into a web page.
- “Google Analytics” will open Analytics within the wrapper of AdWords.
- “Keywords Tool” is the tool I recommend clients use to find the most popular keywords for their business type and industry.
- “Traffic Estimator” is a tool to see traffic estimates based upon a new location, language, network, and of course keywords.
- “Find Placements” is a tool wherein you can request that a word or phrase typed in at a specific website page will bring up your Ad. There is also an advanced options and filter section for specific targeting, beyond location, language, and devices.
- “Contextual Targeting” is a tool that will look for keyword groups based upon the words you add.
- “Ad Preview and Diagnosis” allows you to search for your Ad just as you would on Google Search without accruing any impression cost. Of course this would only be needed if you did select an Ad type of cost per impressions (views of the Ad).
Campaigns: In this section we have tabs at the top which include: “Campaigns”, “Ad groups”, “Settings”, “Ads”, “Keywords”, “Ad extensions”, and “Dimensions”.
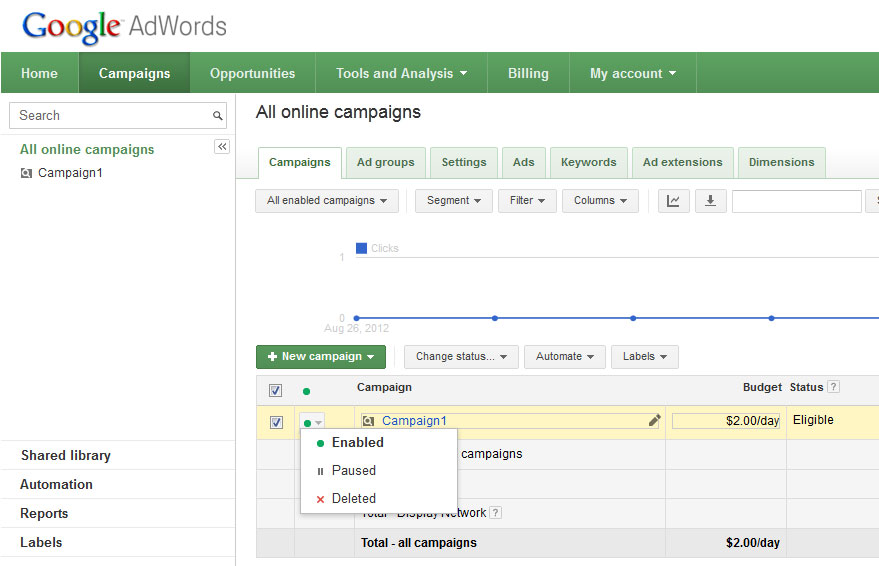
Under Campaigns we select either “all enabled” or “all but deleted campaigns”. You’ll see the “new campaign” button in green in case you wish to create an addition campaign/s. My suggestion, start with one campaign at first to ensure that you are very familiar with the settings before you branch out. You’ll see the campaign name, the daily budget amount, the status (shows whether a campaign is paused, deleted, or eligible to show ads). The number of clicks, impressions (how often your Ad is shown), CTR (click through rate, the number of clicks your Ad receives divided by the number of times you Ad is shown). Avg. CPC, Cost, Avg. Pos. (the average rank of your Ad compared to others), and Labels (you can ignore this). There are also additional tabs of “segment”, “filter” and “columns” at the top of this area, which are again about advanced reports, so just ignore for now.
- Ad Groups: The next tab “ad groups” is a group within a campaign, so here I have “Add Group #1” which is a part of my campaign “Campaign1”. The information provided here is the same as with Campaigns, so unless I chose to add a new ad group there is nothing to see that is new.
- Settings: The important part about this tab section is “location”. When I click this I will see all of the cities I have targeted for, with the ability to edit the Campaign name, the search type, the networks to be targeted, and devices that will see my Ad. Under “Locations” I can now “remove” any of my targeted locations, or search “nearby” for other locations to include. Below this area I can edit the bidding and budget.
- Ads: Here I will see my Ad as it would look in a search, with all of the data shown in Campaign, yet there is a new dimension called “% served” which shows the percentage of times an Ad is shown vs. all Ads in a group, well, assuming you did have more than one Ad in a group.
- Keywords: Here you will see all of the keyword groups you’ve added to your Ad group. The status section will let you know if the keywords are eligible, disapproved, or rarely shown due to low quality score. Assuming you selected good keywords then all should read “eligible”. Note that on this page there are additional tabs at top which include “edit”, “change status”, “keyword details”, “automate”, and “more actions”. These are used to set conditions for the keywords as well as general editing.
- Ad Extensions: More advanced reporting/filtering for those who select to use the Ad Extensions which I noted above was a Map, Phone Number, Google+, and links additional website pages.
- Dimensions: Here is more tracking/reports information this time by a variety of preset criteria, per filters you apply. Again, much like Google Analytics.
Left Sidebar under Search (Campaigns)
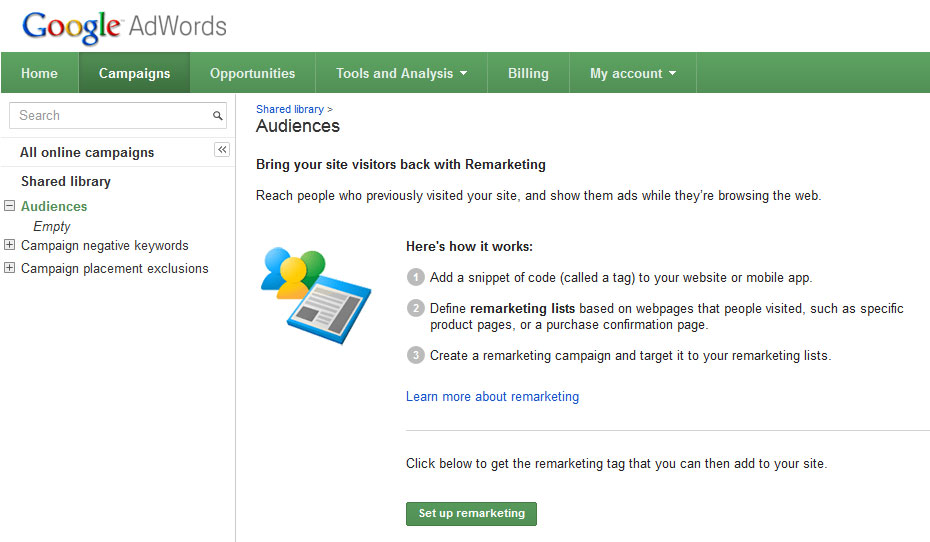
Lastly, you will note some additional link options in the left column of the Campaign page. Here we have “Shared Library”, “Audiences”, “Campaign negative keywords”, and “Campaign placement exclusions”. “Shared Library” is for sharing across campaigns and Ad Groups. It contains the following three campaign options:
“Audiences” is for “Remarket” to people who visited your site before.
I’ve never worked with this, but it does look interesting. In short, you create a list of Ads based upon webpages they’ve visited.
“Campaign negative keywords” is for creating a list of keywords that you don’t want to be used to find your Ad.
“Campaign placement exclusion” is for crating a list of websites you don’t want your Ad to appear on.
* Edit, Pause, or Delete a Campaign
From the “all online campaigns” page click the box next to your campaign name, and then select the green icon. As the screen shot denotes you can see and/or edit the status of enabled, paused, deleted.
Well, this was a long Blog post, but I wanted to cover as many of the features as possible … hopefully you found what you needed. Remember, if you are a client and plan to start a campaign then be sure to get the $100 in free Ad Credit code from me, and of course if you need help with the campaign I am pleased to assist.
You can learn about Google AdWords terminology here: https://support.google.com/adwords/bin/answer.py?hl=en&answer=90956
