A question I am periodically asked is do I need a site-map for my website, and if so, how to create and manage site-maps? The question of whether one needs a site-map or not is both “yes and no”. If you don’t use a site-map the search engines will still index your pages over time. Even if you don’t submit your website to the search engines eventually if will be found if you are linked to elsewhere, and it will be crawled (searched through) based upon the predefined crawl rate of the search engine. The reason for creating a site-map is that it allows you to tell the search engines which pages you want them to index. You can also change the search frequency, and the page importance rating (meaning that you would rather have some pages come up in a search more readily than others). In most cases your home page will come up first before the other pages, yet I have seen many examples where this doesn’t happen in my searches.
Sitemaps for SEO
The first thing to know is that a “site-map” will be one of two types. There is the website site-map that a visitor might see within a website – this is a list of the pages the website contains, often with a description overview of the web page content. This is helpful for websites that don’t use a search engine and/or have lots of content with sub-level pages. The other type of sitemap is what this blog post is about. This is the XML file that contains all of the pages that you want the search engines to index (save and show in search results). In this regard you create your site-map, name it as “sitemap.xml”, and then place it is your root directory. For those of you new to the web, the root directory is folder where your web site files are stored and is typically called the “public_html” , “www”, or just “/”. Just be sure to add it where all of your site files are (especially your index.html or index.php) and the folders are shown.
To create a site-map there are lots of free site-map generators available. One of the better ones is https://www.xml-sitemaps.com/. All you do is include your home page’s URL in the “Starting URL” box, change the frequency if desired (I leave this as is, so “none”), under “last modification” select “use server’s response” (this ensures that the search engines know when you’ve made changes to a page, so to re-index it), and for priority select “Automatically Calculated Priority”. If you had selected “none” here then all of your pages would be assigned the same value. You then click “Start” and up to 500 pages will be created for free. This will work for most websites, but if you have a blog which exceeds this number of pages you might want to purchase their upgraded version so you can index all of your content. The link to it is: https://www.xml-sitemaps.com/standalone-google-sitemap-generator.html
Note: If you do have a blog, I would suggest using a good SEO plug-in. This will create an XML sitemap for you, and the plug-in will allow you to define which pages are indexed, and help to prevent categories, and other content coming up in searches – you simply want your pages and posts to be linked to.
Once the XML file is created you can open it with web design software in source code view, an XML code reader, or with Notepad, and then edit the priority ratings. What I do is assign the most important pages to a high value, and then lessen the value for those pages which I feel are supplemental, or otherwise less relevant for my visitors.
For example, the following code from my sitemap has my home page listed with a value of 1.00, and my home page version listed with a priority value of .80:
<url>
<loc>https://www.ecurtisdesigns.com/</loc>
<lastmod>2013-01-13T07:50:45+00:00</lastmod>
<changefreq>monthly</changefreq>
<priority>1.00</priority>
</url>
<url>
<loc>https://www.ecurtisdesigns.com/index.html</loc>
<lastmod>2013-01-13T07:50:45+00:00</lastmod>
<changefreq>monthly</changefreq>
<priority>0.80</priority>
</url>
Once you’ve edited the code as desired you simple need to upload it to the root directory as I’ve mentioned above. Okay, so I know some will ask, “how to I upload the file?”. There are two ways. You can use FTP software or your hosting account utility. For FTP, there are many free applications available, as well as commercial ones. If you use Firefox for your browser then I would suggest the free add-on called “FireFTP”. Once the plug-in is installed do the following:
Click on the drop-down box at the upper-left corner (under the text that reads FireFTP). You will see the options “Create an account” and “Quick connect”. Select create an account. A pop-up window opens are there will be three tabs – “Main”, “Connection”, and “Advanced”. Under “Main” type in an account name (this can be whatever you want so as for identification purposes). Under “Host” use the IP address, such as 123.123.123.12, or you can use ftp.mysiteurl.com, or www.mysiteurl.com. Any of these will work. I often use the IP address though since in many cases the web page I am sending files to isn’t yet linked to a domain name.
Below the Host there is as section called “ID”. Here we have “Login” and “Password”. Of course all you do is add the username for “login” and the password provided to you (both should have been emailed to you by your hosting company). The other two tabs of “connection” and “advanced” can typically be ignored. The exception being that if you are using encryption for the file transfer then you will need to select the security type under “connection”. I for example use SFTP. That is really all there is to it. From then on you simply go back to the drop-down box I noted initially, select the account name, and then click the “connect” button. At this point you will see your file structure at the left panel, and the hosting account file structure at the right panel. Navigate to where you’ve saved your sitemap.xml file from the left panel, and then left-mouse click on it to select it. To send the file over you can use the green arrow “–>” or right click on the file and select “upload”.
The other option for transferring files is to use your hosting companies file manager utility. I have worked with over 50 hosting companies and all had a file transfer utility of some type, typically called “File Manager”.
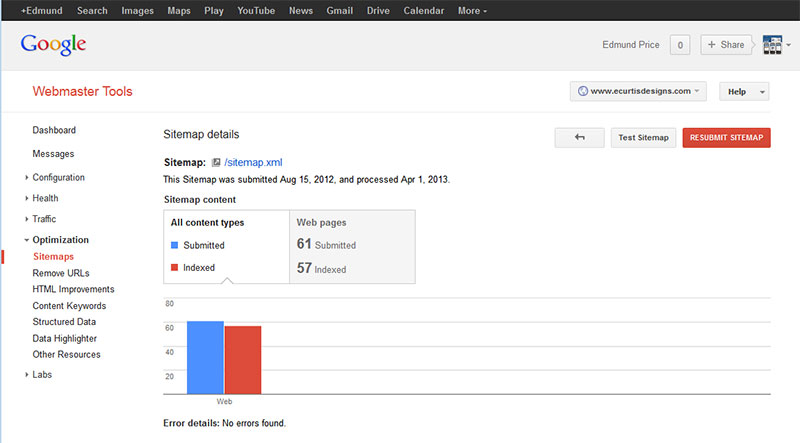
Okay, so once you’ve uploaded your file you login to Google’s Webmaster Tools, open the “Optimization” category on the left column, and then select “sitemaps”. As the screenshot illustrates you will see the option of “submit sitemap” or if you already have one then “resubmit sitemap”. The “test sitemap” will simply let you know if the sitemap is functioning properly. Note if you click on the sitemap name (blue hyperlink) you will see a page load that will show it to you online. My sitemap for example is: https://www.ecurtisdesigns.com/sitemap.xml You could also simply enter the URL path to the sitemap to view it in your browser window.
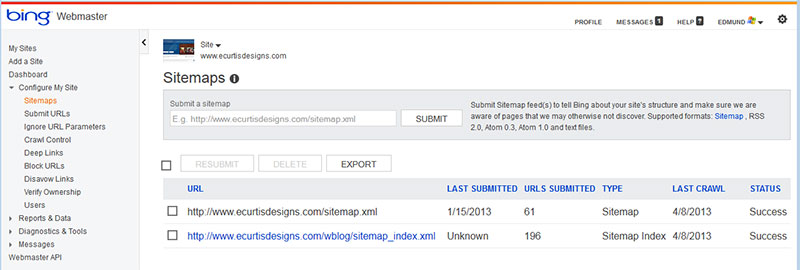
Once you create your Google Sitemap you will likely want to ensure that Bing has indexed your sitemap as well. In case you were unaware, yes, Bing has a Webmaster Tools section also. Under their “Dashboard” they have a “Configure My Site” section, which includes “Sitemaps”. There is lots of configuration setting options, so I will leave this to another post, but the important thing at this point is just to ensure that your sitemap is listed. If not, note the section at top which reads “Submit a sitemap”. Here you simply paste the URL path of your sitemap and select “Submit”.
Hopefully you now feel comfortable with Sitemaps. Look for my upcoming post on using Bing’s Webmaster Tools.


