If WordPress is new to you you’ll need to know how to set-up a WordPress account, and once set-up how to administer it effectively. This post will specifically address the installation process.
The first thing you need to do is set-up your hosting account. For WordPress you will need a Unix/Linux hosting platform (PHP is required), and my suggestion is to utilize HostGator for hosting since they use “cPanel” as the administrative interface which is both full featured and easy to use, they have good customer support, and they are less expensive that many other providers.
Once you log-in to cPanel you will want to set up your WordPress database. There are two options with cPanel – you can use “Fantastico De Luxe” to automatically have WP installed (creates both the WordPress files and database), or you can do it manually (which is my preference). Note that the auto-setup with Fantastico is very similar to what GoDaddy offers in their WordPress hosting, and while easy to do it is not always best. I prefer the manual set-up option since no unnecessary files are created and I have found that updating WP as well as porting the site to a new hosting platform is simpler in the do-it-yourself option.
For manual installation scroll down to the “Databases” section and select “MySQL Databases”.
On the MySQl Databases page you simply add a suffix to the database (where it notes “New Database”) and select the “Create Database” button. After creation you will see the database name with a size of 0.00 MB next to it, and no users. Next we create a user in the “Add New User” section. Just as before you simply add your username in the box provided and then add a password – my suggestion is to always use the password generator to ensure that the password is secure. You’ll see green checkmarks to show all fields have been entered correctly, and then you select “Create User”.
At this point be sure you have copied the database name, username, and password since these will be needed in the WP config later. Note that when your password is created a page will load that tells you what your username and password is – this sentence follows with a period (.) and the period is not part of your password.
Now that you have your database and database user created you simply need to link these up to each-other in the section “Add User To Database”. Assuming you only have one user and one database they will both be shown and all you need to do is click the “Add” button. Otherwise you just assign the correct user to the correct database.
The referring page will ask you about “privileges”. Since WP will need to have all privileges initially select the box at top and all boxes will be checked.
———–
Security:
Note that for the sake of enhanced security some suggest coming back to this area after WP is installed and unchecking “All Privildges”; next you ensure that only “select”, “insert”, “updated”, delete”, “create”, “alter”, and “drop” are checked. In addition others suggest changing the “WP” prefix to something else to help block the WP bots looking for exploits. There is documentation online on how to do this so I’ll keep this short, but in essence you can select a different prefix during the initial WP installation process (more on this follows) or if your WordPress site is already live you change the change the $table_prefix = ‘wp_’ in the WP-Config.php file and within the database tables. To make the database change you can use PHPmyAdmin’s search/replace feature, or edit the database in a code editor that has find/replace functionality. Finally never use the default “admin” username and ensure that your WP password is not a simple one.
———–
Now that your user is linked to your database with all privileges you are ready to install WordPress. Go to https://wordpress.org/download/ and select the latest WP build. Download it. Log-in to your hosting account by FTP. If you are new to FTP you simply add the account name to identify your account from others, a “host” which can either be a URL provided such as www.mysite.com, ftp.mysite.com, or an IP Address such as 123.123.123.12. You add your hosting account username and password and then FTP access is set-up. If you have yet to link up a domain to your hosting account then simply use the IP address option.
Open your hosting account and you’ll see a “public_html” folder which is where you site files are placed. In some hosting platforms the file directory will be called “www”, or just “public”.
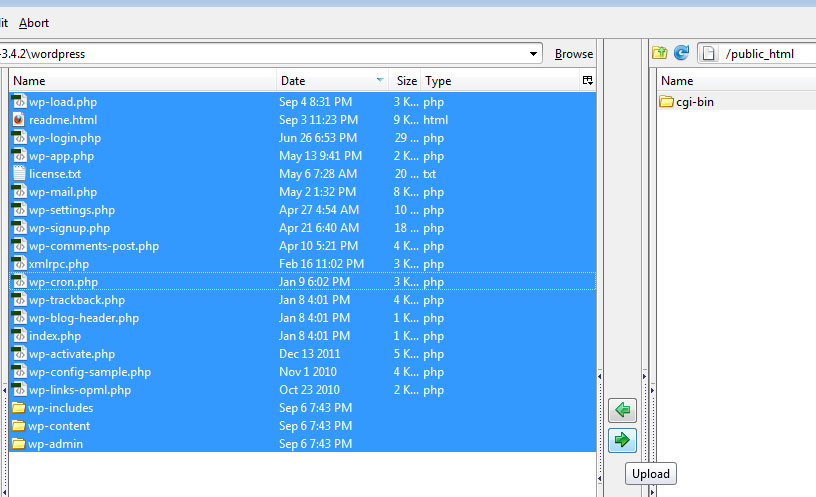
Now that your FTP account is set-up and you’ve downloaded WordPress, just unzip the WP archive and copy the files – ah, but first note that WordPress will have the files within two folders: the first is the latest build name, which for this install was “wordpress-3.4.2”, within this is the folder “wordpress”, and inside here are the files that you upload. You don’t want to have the WP files uploaded within a folder unless you have existing website files that you want to keep and your goal is to link to your blog within a folder.
As you can see from the screenshot above, you simply upload the files and three folders into the public_html folder in your hosting account. Once this is done, as the WP “readme” file notes, you navigate to wp-admin/install.php. The URL path (placed in the browser URL bar at top) is your domain name (or IP address). For a domain it would be https://www.mydomain.com/wp-admin/install.php (replace domain name with your own); for an IP address it would be https://123.123.123.12/~username/wp-admin/install.php (replace hosting account username and IP address with your own).
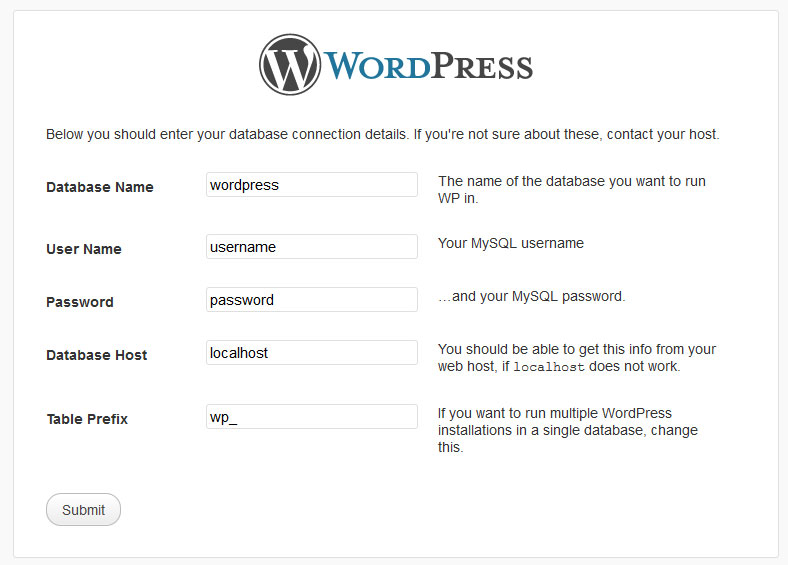
After you paste the install.php URL into the bar you’ll get a page that says “There doesn’t seem to be a wp-config.php file. I need this before we can get started.” Click the “Create a Configuration File’ button. The next page will ask you to provide the database name, user name, and password. This refers to the database creation information we did previously. You can leave “localhost” as the database name (most Unix/Linux hosting platforms use this), and you can keep the “wp_” table prefix unless you intend to change this for security reasons or as they note you have more than one WordPress database installation in your hosting account.
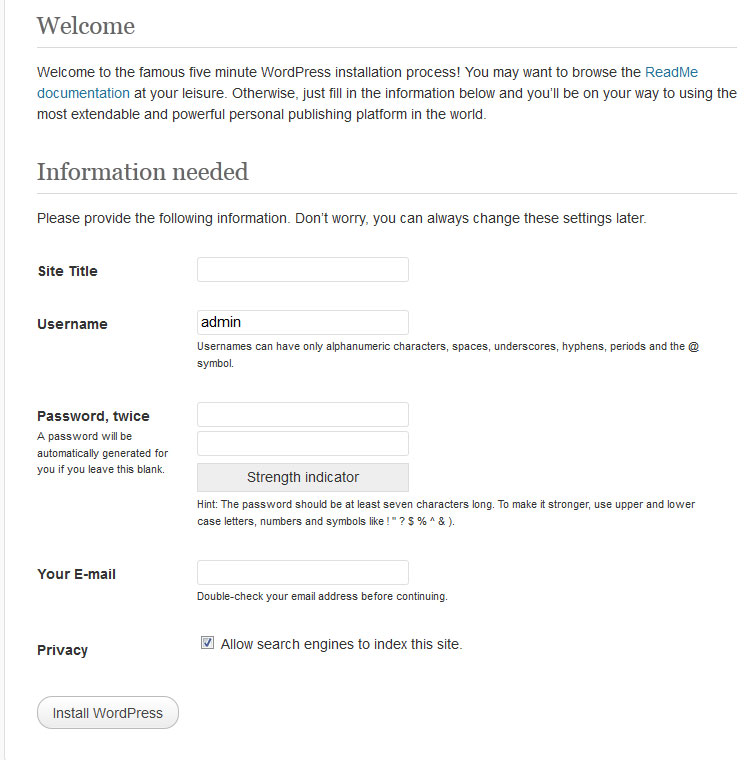
After you add your database name, username, and password click “submit”. On the next page select “Run the Install”. At the Welcome screen that follows you select your “Site Title”, “username”, “password”, and “Your E-mail”. The “privacy” options refer to whether you want the search engines to index your site or not – my suggestion would be to unclick this box until your site is complete (this can be changed later in the WP admin area). Be sure to save your username and password and then “Log-in”.
Upon “log-in” you’ll be at the “Dashboard”, this is the backend of your WordPress site. If you want to view your website live as it is now you can click your site name at the top-left corner. My suggestion at this point is to delete the install.php file in the wp-admin folder (use your FTP program) since this file isn’t needed anymore, and can pose a security risk.
As you can see from the front page screenshot, the site is pretty basic at this point. In my next blog post I will cover how to work within the backend of WordPress. View my “WordPress – Step Two” post to learn how to set-up the backend of WordPress.
Finally it is important to note that Database backups are needed whenever you make significant changes to your website or you do a WordPress update. These can be done one of three ways. Firstly, log-in to your hosting account backend “cPanel for HostGator” and navigate to the “files” section which includes “backups” and “backup wizard” both will allow you to back up the database.
Below this section is “Databases”, and here any of the first three could be used to back‐up your database as well, though I would use “phpMyAdmin” for this. My suggestion is to use the “backup wizard”. You select (1) backup/restore, (2) “select partial backup” (right column), and then choose “MySQL Databases”, (3) click on database name and choose to “save file” and then place it (save it to) somewhere you can find it. If you ever get hacked or have a problem then you simply go back and choose the “restore” option and upload your saved database.


